Showing posts with label recipes. Show all posts

Wednesday, November 9, 2011

Caramelized Onion and Mushroom Frittata

Golden and scrumptious frittata!

This week has brought me back into the kitchen.  It was time to re-don my apron, pull some ingredients together and make something delicious. The result? An extraordinary frittata.  It turned out so well, that the whole thing was gone within 30 minutes of it coming out of the oven! I've never received so many compliments, the highlight being that I could sell my frittata in a restaurant. Woop! It was my first time making caramelized onions, which isn't as daunting as I had thought, but does require a little extra time to make.

So here it is, to share with whoever comes across it.  I hope it is as delicious to you as it was for my family.

Caramelized onion and Mushroom Frittata

2 medium onions, sliced or chopped
2 Tbsp olive oil

8-10 (or more) mushrooms, washed
8-10 sundried tomatoes 
salt and pepper, to taste

8 eggs
1/4 - 1/2 cup aged cheddar, grated or cubed

Preheat oven to 375F.

Heat oil in a pan over medium-medium high heat.  Add in onions.  Make sure onions are all coated with the olive oil. Once onions are coated, spread them evenly over the bottom of the pan to let cook, stirring occasionally. After about 10 minutes of cooking, sprinkle on a little salt, and continue to let cook. (You may also add a pinch of sugar to help with the caramelization process, this is optional).  A good trick I learnt was to add a little water to the onions to help keep them moist.  Your onions will want to cook for about 30 minutes or more. Depending on how sweet/caramelized you want your onions will depend on how long you cook them for. As the onions proceed into caramelization, they will begin to stick to the pan, requiring you to scrape the pan more often. What you are looking for a rich brown colour in the onions. 

Once the onions have caramelized to your liking, add in the mushrooms. Stir occasionally. After about 5 minutes, the mushrooms should begin to soften and cook. At this time add in the sundried tomatoes. Cook until warm. Remove from heat.

In a separate bowl, whisk together 8 eggs. Add in the cheese. Add in the onion mixture.  Pour into a greased pie plate or pan. I used and 8x8 which I found to be a good size for this mixture. Place in oven for 30 minutes, or until top is golden and centre is solid.

Now comes the best part. Serve hot and enjoy!
Wednesday, May 4, 2011

Gluten Free Pizza Dough....Take 3

Attempt number three came that much closer into the success realm of gluten free pizza doughs.  I am on the scent and it won't be much longer until I crack the code.
What's that secret ingredient that binds it all together?

I am eager to continue to rise to the challenge, as already milestones have been made from the first recipe.  This time around, the dough was cooked, not translucent in appearance, did not have the potential to chip any teeth and tasted like pizza. Though attempt number two did have improvements, the dough was so rock hard especially in the crust, that teeth were one the verge of endangerment. Luckily, no casualties, but extremely close.

For round three, I dove into research.
Hmmmm. Scratch that statement.
For round three, I tried a new recipe variation. This time around the dough actually cooked, and was airy much like your typical dough. Though still very different.  Downsides: dough did not rise, has no elasticity, and required oiled hands for kneading.  Regardless, the product that came out of the oven, in fact tasted like pizza. That is an achievement in itself. For this round of dough, I shared it with my gracious hosts for the week here in Calgary.  Before I thought to take a picture, the pizza was eaten. A good sign if nothing else!

The recipe is as follows:

1 Tbsp yeast
1 1/3 C just beyond lukewarm water (or warm milk)
1 tsp sugar
1 1/3 C rice flour
2/3 C corn starch (or tapioca flour)
2 tsp guar gum
1 tsp salt
2 Tbsp olive oil
2 tsp cider vinegar
1/3 C cornmeal (gf) (optional)

Preheat oven to 350.
(If using milk, warm in a saucepan until just above room temperature)
In a bowl, add warm water (or milk), yeast and sugar.  Set aside and let yeast do its thing...it'll start bubbling into a beautiful froth of sorts.

In another bowl combine all dried ingredients. Stir thoroughly.

Once the yeast has had time to ferment and bubble, add in vinegar and olive oil.  Stir. Then add to the flour. Mix together, making sure all is combined well. Mixture will start looking like dough.  Add a little oil to the dough, and some onto your hands (this dough is sticky!). Begin to gather into a ball.  You can knead it a little.

(I tried to let it rise, and perhaps I did not give it enough time, or the temperature was not right for rising conditions. Regardless, nothing really happened. Next attempt I will test out a longer rise and see what comes of it.)

Because the nature of gluten free dough does not have much elasticity, stretching the dough onto a pizza pan is not going to happen.  Instead, I put the dough in the centre of a greased pan and began patting it outwards. You could also try rolling it. Once all laid out, I stuck it in the oven for about 5 minutes.

Remove from oven, dress it in all your favourite pizza toppings and return to cook for about 10-15 minutes or until crust was looking golden on the outsides.

Reflection: all in all, I'm really impressed with how this version turned out. The cider added a nice flavour.  Upon future attempts, I would like to test out milk instead of water, and tapioca flour instead of corn starch to see if there are any remarkable differences. What would happen if I added an egg?

Saturday, April 16, 2011

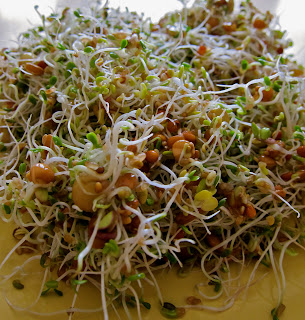
Sprouting

There comes a time in the winter, where I begin to crave fresh food.  Not like the sort-of fresh foods from the grocery store. We all know, it came from many miles away.  As March rolled in, it was time to do something, garden season was just around the corner, and though I won't be in a place to sow any seeds, I decided I could at least grow some food inside. So, I bought some sprout seeds. Actually, truth be told, I bought these seeds in January, hoping that somehow the knowledge of growing sprouts would just somehow filter into my mind naturally. Somedays, I forget that researching is a possibility. Call me stubborn, it's alright, I'm aware of this quality. I've lived with it for some time.
Where was I now? Oh yes...it took me awhile to get the sprouts underway, but when it's time for something fresh and homegrown, there's no stopping me. I finally hit the books...or rather in this case the internet search engine and went to work. Let me just preface this by saying that growing sprouts is not as daunting as I was making it out to be. In fact, I am surprised that more people don't grow sprouts, because it's fast, convenient and you get a fresh healthy snack. Albeit, the endless warnings of contaminated seeds is a little off putting, and leaves a person wondering "gee, are my seeds good ones or bad?" but I think there is a time when safety concerns need to be put at bay...how else are we ever going to accomplish or do anything? Honestly. If you wash yours seeds thoroughly, and you can even do a flash heat, then it will take care of this little hiccup.

Grow sprouts.  They're so refreshing, great on sandwiches, great on salads, great on you...or rather in you.
Here is how you too, can make some sprouts:

First, got buy some sprout seeds.  You can find them in the bulk section of your grocery store, order them online, buy seed packets, or....if you've got dried beans/lentils then you can make sprouts.

What are sprouts...you wonder? Dormant seeds. Add some water, and those seeds come to life. Incredible...no?

Step one: Wash your seeds real well. Get a jar, add the seeds, add some warm H2O and do a little shake and dance. Sprouts like to dance, little known fact. Rinse and repeat, 3-4 times.

Step two: In a mason jar, add your freshly washed seeds in jar, along with water, to cover all seeds. This is what is going to hydrate the seeds, waking them up from dormancy. You are going to want to let your seeds breath. Get yourself some cheese cloth or even some panty hose, put over mouth of your jar, and seal it with your jar ring.  Set in a dark place for 24 hours, the closet is a good place. Or a cupboard if you are feeling a little leary of growing sprouts next to your unmentionables.

Step three: (you do not need to remove cloth/ring combo) drain the water from the jar.  Rinse with cool water several times.  This is the key to getting great sprouts. You want to keep the seeds moist, but not sitting in a pool of water.  Be sure to rinse twice a day, because this will keep the seeds moist AND fresh. Stagnant moisture is no bueno!  Return them to a cool dark spot.  You will want to rinse the seeds twice a day. Keep this up for a couple days, rinsing with fresh water, until the seeds begin to sprout.  Then, once they are looking good, the sprouts growing long, they'll be pretty white/pale looking.  Put them in a sunny windowsill for a day (don't forget to rinse still) and they will absorb some chlorophyll and turn a beautiful green.  They're now ready for eating.  Rinse them one last time, remove from jar and enjoy!

Thursday, March 24, 2011

Gluten Free Chocolate Zucchini Bread

More playing around in the kitchen.  Recently, I've been on a big zucchini kick. Then again...I'm always on a zucchini kick! It's such a versatile and yummy vegetable. But I have been wanting to make zucchini bread for a while, and today, I got into the kitchen and let the love pour out. Now I have two lovely loaves to enjoy this coming weekend.


Chocolate Zucchini Bread
(a la healthy and gluten free variety)

2 cups rice flour
1 cup tapioca flour (or corn starch)
3 tsp guar gum
1tsp baking soda
1 tsp baking powder
1 cup cocoa powder
3 eggs
1/2 cup oil (or butter, melted)
1/3 (or 1/2) cup honey
1 cup applesauce
1 cup yogurt
3 tsp vanilla
2 cups zucchini, grated
handful of walnuts and raisins (optional)
1/2 cup semi-sweet chocolate chips (optional)

Preheat oven to 325F. Grease and flour two bread pans (8 x 4).  In a medium bowl, mix together thoroughly all dried ingredients, set aside. In a separate bowl, add all wet ingredients, making sure to stir in each one before adding the next. Add the dried ingredients, one cup at a time to the wet mix. Stir in thoroughly.  You can add more applesauce to the mix, if looking dry.  Add to the greased pans and you are ready to bake! Bake for 30-40 minutes or until a fork (or other tester) comes out clean.  Let cool for about 20 minutes, then remove from pan, and continue to cool on a rack. Or go ahead, cut yourself a piece. Enjoy!

Friday, December 24, 2010

Adventures in Peaches: Pt. 2

The kitchen has been a simmer the past few days, as mom and I tackled a fridge full of thawing peaches, of which at times, would spontaneously spill out, creating pools of peach juice on the floor. 


Pies were the first to happen. I ended up making two, which though the filling turned out exactly as I had hoped, the crust did not hold up its end. It did not fully cook, except for the top edges which makes me think that perhaps I should try pre-cooking it on low for a bitt before adding the filling. Will this unlock the key to the under-cooked pie crust mystery? Upon further research into the freezer, there still remains one container of cut frozen peaches, and I shall put them to good use on another pie and give the crust recipe one final chance.


Making the jam was actually my favourite part, so much learning from just one little endeavor. I ended up making three batches, and felt right at home stirring away, while peach-delights came wafting up out of the pot.  I felt completely at ease, and could certainly be happy to spend some of my more quiet days humming about the kitchen, preparing food to store for the winter, or give away to friends and family as gifts, harvested fresh from the garden or found at the local farmers market. 


For the first, I used the traditional grocery store pectin, and reading the box, out of curiosity, their recipe for one batch of jam called for 7 cups of sugar. Yikes! But understandably, that kind of pectin is dependent upon sugar in order for it to bind. What did they use in early jam making I wonder, before store bought packages of pectin came around? Time to nerd out and do some research!  I decided to ignore the pectin's need for loads of sugar, and followed the recipe out of "stocking up".  The final results for the first batch was decent. The flavour errs more on the honey side but otherwise emphasized the peaches. The only downside was that it turned into a peachy sauce as opposed to jam, due to my decision to forego the hoards of honey. Now it is more versatile...and can be added to pancakes and ice cream. That's what I had planned of the first batch anyway...


  For the next two batches, mom located a different brand of pectin while exploring a food co-op. The brand is called "Pomona's Universal Pectin" and though I think more costly than your typical pectin, this one jells even without using loads of sweetener.  The pectin has been extracted by citrus peel, and is activated by calcium rather than sugar. Upon use, I am impressed. The two batches turned out much better, and have jelled together, into  a peachy dream of goodness.


Canning, as it turns out, is not such a terrifying process afterall. Working with glass felt like a rather daunting task, however, I was surprised to learn that the mason jars can withstand a fair amount of heat.  Using a large stock pot, fill with water, and add the jars in and let them come up to a boil.  In a smaller pot, though one could also just use the same pot as the jars, heat all the lids. There is a special jar funnel, to help keep the seals on the jars clean, it has a wider mouth than traditional funnels. Using thongs, remove a jar from the water bath, pouring out all the water, put funnel into place, and using a ladle, pour in the jam, until about 1/4" from the top. Once the jam has been poured into the jars, take a clean cloth and wipe the rim, to make sure there is no residue left. Again, using the thongs, remove one of the lids, sealing just to close, but do not tighten. Once all the jars have been filled, place them back into the hot water bath, making sure to cover the tops of the jars fully with water. They will then need to stay in the heated water for 10 minutes which will ensure that the lids have fully sealed. Et Voila! Fresh peach jam to stock the cupboards with for the rest of the winter!


Now, it is time to make some toast and enjoy!

Monday, December 20, 2010

Adventures with Peaches: pt. 1

Project number one:
Transforming a freezer full of peaches into Jams and Pies!
(Dedicated to Mom and Dad for all their help)


Admittedly, peaches are my favourite fruit. Their bright peachy colour, the soft fuzzy skin, and when ripe, sweet and juicy. I spent many a day this past August, in hesitation, before calling my mom and asking, or perhaps begging her, to go around to the local farmers market to pick me up $50 worth of peaches. And though I don't know what the final cost was, she certainly cleaned out the area in peaches this summer! One look into the downstairs freezer, revealed many endless bags and containers full of peaches. I wish I could have a small window into the past, to watch mom and dad, in the kitchen over countless hours, peeling, cutting, soaking and munching away on fresh local peaches. They certainly earned a fresh pie or two! Needless to say, it is now mid-December, it is time to return the freezer back to my parents.


First: Doing the research, finding the recipes, and preparing.


To begin, pies.
There is something so beautiful about making pies. One can't help but to slow down and feel connected to the process. Though, it must be said, I have yet to find a recipe for the crust. I wonder how professionals are able to make such good crusts? What's the secret?


My intent with the pies (and the jams too) is to emphasize the true flavour of the fruit. Not so much the sugar that is added. For it is the peach, in all its splendor, that one should celebrate both in eating and in mouth. I located a simple recipe in "The Joy of Cooking", and though it calls for sugar, will replace with honey. Who says you can't bend the rules in recipes?


Peach Pie (from the Joy of Cooking)
Serves 8

Flakey Pastry Crust

2.5 pounds sliced peaches (about 5 cups)
combine with:
1/2 -3/4 sugar (I used honey and about 1/4 cup)
3 Tbsp cornstarch
3 Tbsp lemon juice
1/8 tsp salt

Let stand for 15 minutes, stirring occassionally.  Pour into the bottom of the crust and dot with 2-3 Tbsp butter (optional).
Brush the overhanding edge of the bottom crust with cold water. Cover with a lattice or top crust, then seal the edge.  Bake  the pie for 30 minutes at a temperature of 425F . Reduce heat to 350F for about 25 more minutes until thick juices being to bubble through the vents. Let the pie cool on rack almost completely before serving.


Once the pie portion is complete, onto the jamming and canning!


Though I have made jams in the past, again the struggle is not drowning out the flavour of the fruit. Last jam session, many years back included strawberries with what felt like I was adding a sack of sugar per batch. This could be my own mistake of following the recipe on the box of a pectin container....so really, what am I complaining about? Again, I have decided to go with using honey as opposed to sugar, and have located successfully a recipe which actually, and surprisingly calls for honey! Hurrah, thank goodness there are books out there that aren't just reliant on sugar as a means to all baking! The jam portion of the plan looks to be the easy part, learning to can is going to be the over arching learning experience here. Apparently past canning experiences appear to be rather foggy to nonexistent. How did I get the jam into the jars? Must have decided working with glass jars too risky and left that detail up to mom. Now vital life skill is missing in a time of need. No need, there is still time to learn. 


Reading an old cookbook, perhaps the preserving bible, entitled "Stocking Up", the author makes canning sound simple. What could go wrong right? Hrm, this calls for having a back-up coach, my mom, to bring a watchful eye to the process, perhaps giving tips on how not to invite spontaneous exploding jars! This all is becoming rather exciting...perhaps I shall even wear goggles. (for fashion purposes....of course)


Recipe for Peach Jam (from Stocking Up)
Yield: 10 6oz jars

4 pound fresh ripe peaches (about 4 full cups)
1/4 cup fresh lemon juice
1 package powdered fruit pectin
2 cups mild-flavoured honey

Wash, peel and remove pits from fresh peaches. Chop or coarsely grind, blending with lemon juice. Place fruit in large 6-8 quart saucepan.  Add pectin and mix well. Place over high heat, bringing to a boil, stirring often.  When fruit is boiling, slowly stir in the honey, blending well. Continue to stir, and return to a full rolling boil. When boil cannot be stirred out, boil for 4 more minutes.  Remove from heat. Stir and skim  for 5 minutes to cool slightly. Pour into prepared glasses, allowing 1/4-1/8 inch space from rim.